Raspberry Pi Image
Using the pre-built Raspberry Pi Image
We have created an customised version of the Raspberry Pi Lite image with Cumulus MX pre-installed and ready to go.
This is designed to be what is called a "headless" installation, that is to be run on a Raspberry Pi without a monitor or keyboard attached to it. As such the image does not contain a Graphical User Interface (GUI), it is a command line only installation. It is possible to add the GUI later if you want it.
Alternatives to using image
Should you decide not to use the image, please see instructions in the support forum about installing MX, about installing specifically on Raspberry PI computer, and about installing on any Linux computer.
Pre-Installation Steps
You will need:
- A suitable (micro) SD (high capacity) card for your Raspberry Pi
- A minimum size of 16GB is recommended. Be sure to buy a good quality card.
- You can use an SSD instead if preferred [with the minor complication that in a later step you will need non-WiFi access to the Raspberry Pi (keyboard and monitor, or SSH over ethernet) as you cannot enter the WiFi details from a Windows PC to the linux SSD (Windows cannot understand the different file system used on the SSD for Linux, it is different to the file system Microsoft uses on a SSD)].
- An image installer to copy the image file to the SD card
- The Raspberry Pi site has a list of suitable software for your operating system. Scroll down to "Writing the image".
- This guide uses Raspberry Pi Imager
- The image file to install
- Download the latest image file from the Software Download page, these are not produced for every MX release.
- An SSH terminal program to configure your Raspberry Pi
- For Windows we recommend using PuTTY
- A file transfer program - though you will not need this right away, you will need it at some point. The main uses will be...
- Copying Cumulus MX updates to your Raspberry Pi
- Extracting the diagnostic files from Cumulus MX if this go wrong
- Setting up a web site
- A popular program for Windows is WinSCP which shares some configuration with PuTTY (but some people prefer FileZilla program and its interface).
Installing the Image
This installation was performed on a Windows computer using the Raspberry Pi Imager v1.4 software
- Insert your blank SD card into your computer - if not blank whatever is on the card will be erased.
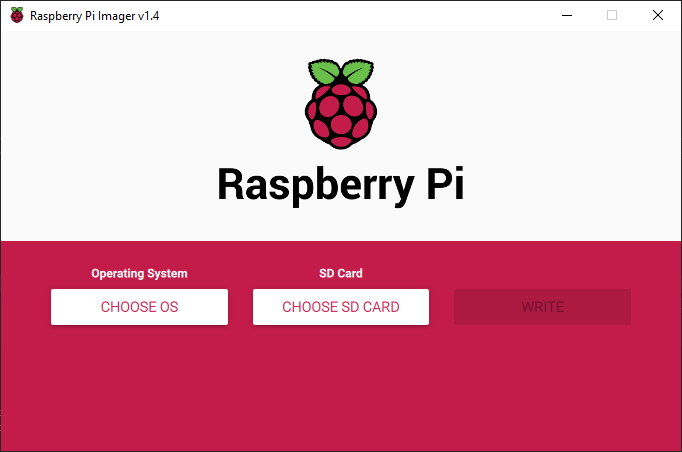
- Start Raspberry Pi Imager
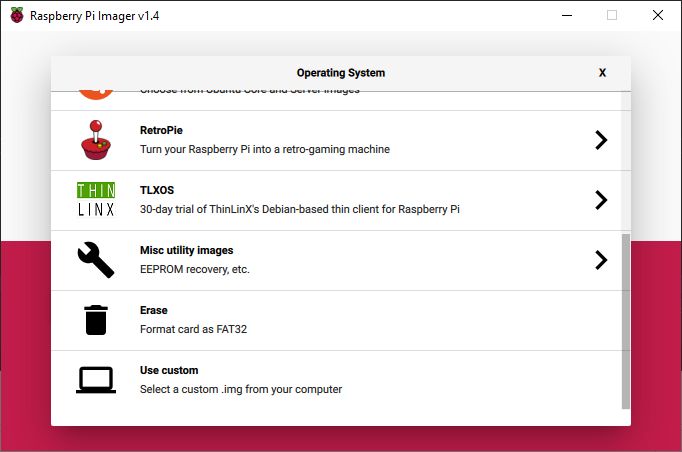
- Click the CHOOSE OS button, scroll down to the bottom of the list and select Use custom
- Browse to the location of the OS Image zip file you downloaded - do not unzip it
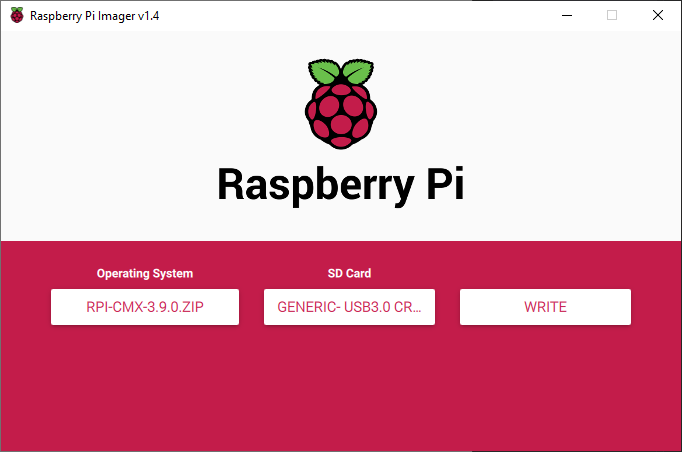
- Click CHOOSE SD CARD, and select the SD card from the Device dropdown - check you have the correct drive selected!
- Click the WRITE button. Writing the image will take a few minutes
- Once the image has finished been written, you can close Raspberry Pi Imager
- Click the CHOOSE OS button, scroll down to the bottom of the list and select Use custom
- OPTIONAL - If you wish to connect your Pi to the network using WiFi from the first boot, then you will need to follow these additional steps.
- Note. If you connect via an cabled network, you can always configure the WiFi later using the command line
- Eject your SD card from your computer and re-insert it
- Locate the SD drive in File Explorer.
- On the SD drive edit a file called wpa_supplicant.conf.txt with a text editor and...
- Change the country code to match your location - eg. US, GB, FR etc
- Set the ssid to match your WiFi id
- Set the psk to your WiFi password
- Save the file, and then rename it to wpa_supplicant.conf - i.e. remove the .txt filename extension
- Eject the SD card from your computer. Insert it into your Raspberry Pi and power up.
Please note, the edit above changes the country code for the wireless (WiFi) connection, the image is built on the basis that your Raspberry Pi will operate in the GB timezone, and MX will run using the GB locale. You can only modify those after installation is completed on your RPi computer.
First Boot
- Connect the Pi to your wired network if you did not configure the WiFi as per the steps above.
- Power on the Pi.
- Now wait 5 minutes. The first boot will be resizing your disk and optionally configuring your WiFi
- Start your browser and see if you can connect to this URL: http://cumulusmx:8998
- If you can great - you should now see the Cumulus MX console
- If not, then you will have to find out the Raspberry Pi's IP address from your router. Then try connecting to this URL: http://<ip_address>:8998 (example: http://192.168.1.123:8998 where the numbers before :8998 are those for YOUR Raspberry Pi from YOUR router). It just depends on your router whether it allows use of the URL name (cumulusmx) or requires the IP address.
Verify your SSH Connection
- Fire up your SSH Client - we use PuTTY here
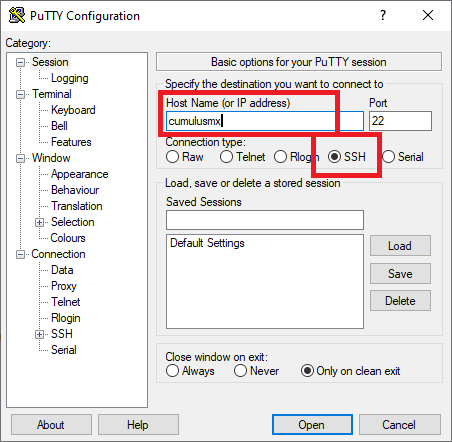
- Enter the hostname as "cumulusmx", and check the protocol is set to SSH. Then open the connection.
- Enter the hostname as "cumulusmx", and check the protocol is set to SSH. Then open the connection.
- (As before, you may need to enter the Pi's IP address instead of the hostname if that does not work)
- You will have the accept the SSH key the first time you connect
- Enter the username "cmx" and password "cumulusmx"
- For prior releases up to 3.15 the username was "pi" and password (note UK spelling) "raspberry"
- You should now change the default password
- Use the passwd command to do this now...
cmx@cumulusmx:~ $ passwd
Changing password for cmx.
Current password:
New password:
Retype new password:
passwd: password updated successfully
- Now you can check/configure your RPi for your locale and timezone settings.
- You must do this before you configure Cumulus MX if you are going to change it. Changing the locale after Cumulus MX has connected to your station means you may be in for a lot of editing of data files!
- The build has set a default which is for en_UK UTF-8 locale and GMT timezone.
- Use sudo raspi-config 5. Localization Options, L1 Locale (select en_US ISO-8851-1 for USA if needed) and L2 Timezone (select the appropriate timezone), then sudo reboot if needed to engage the new settings.
- NOTE: if you are using bullseye (or up), verify all locale settings are the same (run: locale). If not then edit /etc/default/locale and add (or change) LC_ALL=<locale wanted>. save, exit and reboot again.
- Check the status of the Cumulus MX service with the command sudo systemctl status cumulusmx
- You will get some information back, the important bit to note is the line starting Active:, it should say active (running)
- You can leave the SSH session open, you will need it again soon...
Configure Cumulus MX
Now it is time to configure Cumulus MX for your station.
- Start your browser and connect to the same URL as before - http://cumulusmx:8998 or http://<ip_address>:8998
- From the menu select Settings | Station Settings, then follow run of MX this guide for configuring your station.
- Once your have completed all the settings for for station, and successfully saved them, Cumulus MX will need to be restarted.
- Back in your SSH session, send the command sudo systemctl stop cumulusmx, this stops the Cumulus MX service.
- Wait a few seconds, then enter the command sudo systemctl start cumulusmx, this starts the Cumulus MX service again.
- Back to your browser and check that URL - http://cumulusmx:8998 or http://<ip_address>:8998 - again. If all is well, the default dashboard page should start showing the data from your weather station.
- If it does, congratulations, you have successfully started recording your weather data
- If it doesn't, then check back over this process carefully for any mistakes or omissions you may have made.
- If you cannot resolve the problem, then ask for help on the forum
Additional Steps
To be expanded
- Configuring WiFi from SSH
- To be expanded
- Stopping Cumulus MX starting up when the Pi boots
- The build sets up MX to run as a service, and to start when the computer builds, so it will be running when you switched your Raspberry Pi on
- To stop this auto-starting behavior permanently, just type
sudo systemctl disable cumulusmxonce.
- Give your Pi a fixed IP address
- Add a DHCP reservation
- Assign a static IP address
- If you need to use a fixed IP address for your Raspberry Pi, there are 2 methods
1. Adjust your router settings to always assign the same IP address. This facility has different names on different brands of router, look for a section named DHCP. You may be able to choose the IP address (possibly within or possibly outside the range assigned by DHCP), or you may only be allowed to choose 'always assign the address it currently has'. You may need to know the MAC address of the Raspberry PI, but if so that will likely be displayed alongside the current connection.
2. Adjust Raspberry Pi settings to always request the the same fixed address. This is less reliable, because your router may have assigned the requested address to a different device since the Pi was last active. To do this you have to edit this file: « /etc/network/interfaces »
- For Ethernet connection a line specifying port eth0 is needed to describe your ethernet configuration, as the example below. For a wireless connection, it needs similar with wlan0:
allow-hotplug eth0
iface eth0 inet static
 address 192.168.11.100
 netmask 255.255.255.0
 gateway 192.168.11.1
 dns-domain example.com
 dns-nameservers 192.168.11.1
The line "dns-domain example.com" is optional
- You could have also to edit another file, for dns configuration.
- see file «/etc/resolv.conf» to insert these lines:
nameserver 192.168.11.1
domain example.com
Again, the line "domain example.com" is optional
Information
If you previously used Microsoft Windows with each part of a path separated by "\", please remember that all other operating systems, including that for Raspberry Pi, use "/" to both indicate the root (at start) and to separate parts of a path, as per the install location shown next.
Install location
In this image Cumulus MX is installed into /opt/CumulusMX
If you have run MX before, you will copy your existing Cumulus.ini, and optional Strings.ini, into that folder. But be aware that MX has been set to run on boot, so MX will have started, and you must stop it with sudo systemctl stop cumulusmx, before you can add these files.
Symbolic Links
The image contains a number of pre-created symbolic links for Cumulus MX files such as realtime.txt and the standard website tmp files. These links divert these files to the random access memory chip (within the standard Linux folder "/run", the RAM storage area is configured as subfolder "/cumulusmx") to reduce wear on your SD card.
The full list of symbolic links could be added here by another contributor, presumably these cover every .json file that is produced for the default web page with fully defaulted settings as to which files are produces. For the moment, two symbolic link examples are included below:
- the processed realtime.txt -> /run/cumulusmx/realtime.txt
- the processed wxnow.txt -> /run/cumulusmx/wxnow.txt
Root Account
The image does not alter the default root account from the Raspberry Pi OS base image. So the root account does not have a password set, and cannot be used to logon to the system. If you wish to relax this default security then there are plenty of web sites with instructions on how to do this.
Image Customisations
- Based on the 'Lite' version of the Raspberry Pi OS (i.e. the graphical desktop GUI is not included)
- Full install of Mono
- Update of all packages
- Install of Cumulus MX
- Set Cumulus MX to auto-start
- Enable SSH service
- Disable IPv6
- Set hostname to "cumulusmx"
NOTE: If you later want to add the graphical desktop GUI, please check online for the latest instructions, but when last researched, these 4 steps were needed for Buster:
- sudo apt update
- sudo apt install xserver-xorg
- sudo apt install raspberrypi-ui-mods
- sudo reboot
Further Information
There are two other pages in this Wiki that might be useful to read Raspberry Pi computer page and MX on Linux.
systemctl commands
You can use the following commands to control Cumulus MX...
- To start Cumulus:
sudo systemctl start cumulusmx
- To stop Cumulus:
sudo systemctl stop cumulusmx
- To check if Cumulus is running:
sudo systemctl status cumulusmx
- To restart Cumulus:
sudo systemctl restart cumulusmx
- To make Cumulus start at system boot time:
sudo systemctl enable cumulusmx
- To stop Cumulus starting at boot time:
sudo systemctl disable cumulusmx
Starting Cumulus MX from the command line
You may want to start Cumulus from the command line for diagnostic purposes, you can still do this...
First make sure the Cumulus MX service is stopped
sudo systemctl stop cumulusmx
Then issue a change path command to move to the Cumulus folder and start MX there
(Noting it is case sensitive).
- cd /opt/CumulusMX
- sudo mono CumulusMX.exe
Build Creation Notes
Here are the technical details:
- Installed Raspberry Pi Buster Lite (August 2020)
- Enabled SSH
- Installed latest updates - apt update/upgrade
- Installed latest Mono complete stable version (6.12)
- Clean up apt - apt autoremove
- Changed hostname to "cumulusmx"
- Edited cumulusmx.service and copied to /etc/systemd/system
- Disabled mono-xsp4 service - update-rc.d mono-xsp4 disable
- Copied full CMX download to /opt/CumulusMX folder
- Created symbolic links for temp files to /run/cumulusmx
The following commands are useful in creating the image file (created on Debian).
Create image file from SD card - sdb, may be sdc etc.
dd if=/dev/sdb of=/home/<username>/rpi.img bs=1M
Shrink the image file.
Download pishrink from:
wget https://raw.githubusercontent.com/Drewsif/PiShrink/master/pishrink.sh
Then run it...
pishrink.sh /home/<username>/rpi.img /home/<username>/rpi2.img
Disable IPv6
Edit /etc/systctl.conf
Add line...
net.ipv6.conf.all.disable_ipv6 = 1


