Php webtags: Difference between revisions
m (added the 'currcond' tag and enclosed all tags in double quotes to allow apostrophes within text) |
Gemini06720 (talk | contribs) m (→Installation) |
||
| Line 9: | Line 9: | ||
=Installation= | =Installation and Use= | ||
*Download [http://wiki.sandaysoft.com/files/cumuluswebtags.txt cumuluswebtags.txt] | * Download [http://wiki.sandaysoft.com/files/cumuluswebtags.txt cumuluswebtags.txt]; | ||
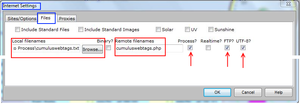
[[File:ScreenShot-PHPWebtags-ConfigSetup.png|right|thumb]] | [[File:ScreenShot-PHPWebtags-ConfigSetup.png|right|thumb]] | ||
* | * place the file <tt>cumuluswebtags.txt</tt> in the Cumulus data folder (or any other location accessible by/to Cumulus); | ||
* | * on the Cumulus main screen, from the pull-down menus, select the 'Configuration' option and then the 'Internet' option; | ||
* | * on the 'Internet Settings' screen, select the 'Files' tab; | ||
* | * in one of the left side boxes (under the 'Local filenames' header), enter the name 'cumuluswebtags.txt': | ||
* | * -- if you have placed the file in a different location, also add the path to the file name; | ||
* -- you can also use the 'Browse' button to find the exact location of the file; | |||
* in one of the right side boxes (under the 'Remote filenames' header), enter the name 'cumuluswebtags.php': | |||
* -- if you are uploading the Cumulus files to a different server location, also add the server path to the file name; | |||
* -- notice that the file extension has been changed from 'txt' (on the left side) to 'php' (on the right side); | |||
* place a check mark in the box under the 'Process?' header: | |||
* -- this tells Cumulus that the file 'cumuluswebtags.txt' contains tags which need to be replaced by actual values; | |||
* place a check mark in the box under the 'FTP?' header: | |||
* -- this tells Cumulus that the processed file must be uploaded to the Web server with all the other files; | |||
* finally, click on the lower-right 'OK' button to save the newly entered settings. | |||
Unless the 'cumuluswebtags.php' file is processed by JavaScript, there is no need to place a check mark in the box under the 'Realtime?' header. | |||
=Usage= | =Usage= | ||
Revision as of 12:45, 28 January 2010
| Name: | PHP Webtags |
| Type: | Web templates, PHP |
| Author: | Ray Beriau |
| Contact: | 'gemini06720' via forum |
| Last update: | 26 Jan 2010 |
| Version: | 1.11 |
Cumulus automatically prepares a number of webpages by using HTML template files. These files contain webtags which Cumulus replaces with actual values from your weather station.
For those using PHP on their website it is possible to have Cumulus process one single file and place all the webtags values in a file of PHP variables. You can include this file in all your PHP webfiles and use the variables as you would any other in PHP.
The PHP file contains all current webtags produced by Cumulus.
A similar project is available for XML webtags
Installation and Use
- Download cumuluswebtags.txt;
- place the file cumuluswebtags.txt in the Cumulus data folder (or any other location accessible by/to Cumulus);
- on the Cumulus main screen, from the pull-down menus, select the 'Configuration' option and then the 'Internet' option;
- on the 'Internet Settings' screen, select the 'Files' tab;
- in one of the left side boxes (under the 'Local filenames' header), enter the name 'cumuluswebtags.txt':
- -- if you have placed the file in a different location, also add the path to the file name;
- -- you can also use the 'Browse' button to find the exact location of the file;
- in one of the right side boxes (under the 'Remote filenames' header), enter the name 'cumuluswebtags.php':
- -- if you are uploading the Cumulus files to a different server location, also add the server path to the file name;
- -- notice that the file extension has been changed from 'txt' (on the left side) to 'php' (on the right side);
- place a check mark in the box under the 'Process?' header:
- -- this tells Cumulus that the file 'cumuluswebtags.txt' contains tags which need to be replaced by actual values;
- place a check mark in the box under the 'FTP?' header:
- -- this tells Cumulus that the processed file must be uploaded to the Web server with all the other files;
- finally, click on the lower-right 'OK' button to save the newly entered settings.
Unless the 'cumuluswebtags.php' file is processed by JavaScript, there is no need to place a check mark in the box under the 'Realtime?' header.
Usage
Use the PHP include / require command to refer to the Cumulus webtags in php.
All PHP variable names are identical to their webtag names. Example: the Cumulus webtag <#forecast> is referred to in your php as $forecast
Example
A simple PHP file
<?php
require_once("cumuluswebtags.php");
echo $time ;
echo "<br/>";
Echo "The current forecast is " . $forecast;
?>
Result:
20:31 on 02 September 2009
The current forecast is Precipitation, very unsettled
Debugging
If you wish to view all the values contained with the cumulswebtags.php file append the parameter ?source=view to the end of the URL.
Example
www.myweathersite.com/cumuluswebtags.php?source=view
This will list all the variable names, their values as set by Cumulus during it's processing, and a brief description of each webtag
