The Alternative Interface (ai.cmx)
An Alternative (additional) Interface
IMPORTANT NOTICE
Due to issues with Alpaca Forms and the AI please DO NOT use any of the following AI pages to configure your station:

Configuration Wizard,   Program Setup,         Station Setup,        Internet Setup,
Third Party Settings,   Extra Sensor Settings, Calibration Settings, NOAA Settings,
MySQL Settings,         Custom Logs,           Custom Alarms,        Display Options or
Locale Settings.

This issue has been resolved for the upcoming release of CumulusMX.
Overview
The Alternative Interface (AI) is currently provided as an addition to the existing Interface for CumulusMX. At the current time, it should NOT be used as an alternative. In the near future this may be possible.
The AI is built using the same technology as the alternative public website and is intended to be flexible and responsive on all screen resolutions. It is modular and designed so that end users can make changes to the way page content is displayed without too much knowledge of html coding. It comes with themes that allow its colour to be changed to suit your personal preferences and a configuration page so that you can do this easily.
The current version is for CumulusMX 3.28.1 and can be downloaded form AI2 for v3.28.01 build 32693. Updated December 2023.
Installation
Download the above package and extract it to somewhere other than your CumulusMX files.
The package contains a second zip file and documentation which you should read to understand what it does and what you can do with it.
Unzip the second zip file, again away from CumulusMX. This is to ensure that you don't accidentally overwrite critical files in the existing Interface.
You should now have a folder called ai2. This can be copied as is into the Interface folder so that it is a sub-folder of the Interface folder. You can rename the AI2 folder if you wish.
To use the AI, you should now use the url: localhost:8998/ai2/
If you renamed the folder then use the new name rather than ai2.
If you access the normal CumulusMX interface from a different computer then use the IP address of the machine running CumulusMX rather than localhost.
If you run CumulusMX through a different port then use that port rather than 8998.
If you already have the AI running on your system then please don't try to merge the two - keep them separate as files will change with each release and this will cause you issues. Technically you could simply create new folders for each AI release and run any of them in conjunction with the existing Interface.
General Features
This is a list of the features that the AI provides
- It has a large number of themes that can be used to change the colours used throughout the site
- The Header and Footer can be fixed (default) or scroll, the footer is always at the bottom of the screen when page content is short and always scrolls on small screens.
- The fonts used are fully responsive.
- The menu has been adapted to have fewer top level entries and focus on managing your weather station. It provides a link back to the default Interface if required. (See not at top of the page).
- All pages use a feature called flex-boxes so can be re-organised simply by changing the order style for each panel.
- The Utility pages have been combined into one page although the Latest Errors page is still available.
Significant, but not exhaustive improvements have been added for accessibility. Anyone requiring these features with knowledge of how to improve the AI2 should contact me.
The Menu
As far as possible, the menu has been split between those pages that simply allow you to view information provided by your weather station and those that allow you to edit them.
Viewing Data
There are three top level menu items at the left to enable this. These are Dashboard, Weather Data and Extra Sensors.
The Dashboard menu item is always visible in both large and small screen, other menu items collapse until you expand the menu with the classic hamburger item.
The Weather data menu contains links for all other pages that allow you to view rather than edit data except for the NOAA reports pages which can still be used to regenerate the current or all missing reports.
The Extra sensors' menu provides access for any extra sensors that are attached or linked to your weather station.
Editing Data
There are four top level menu items to the right of the diamond that give access to either setting or editing your weather station. These are: Logs, Settings, Edit and Utilities.
These mirror the same menu items as on the default Interface. One feature of the AI is that the Settings Menu is a drop down panel with columns. This makes it easier to access all items even on spall screens.
The Default Interface
Access is provided to this via the last top level menu at the extreme right of the menu. It will open the Interface in a new Window.
Screen Shots
Below are a number of screenshots of various pages.
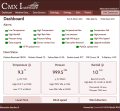
The Dashboard showing some version 3 developments ideas
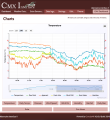
A sample of the carts page - note all charts are zoomable and any buttons always spread across the width of the page

The Today verses Yesterday page. All panels can be re-ordered as required.
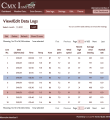
The 'Edit Data Logs' page showing rows hovered and rows selected.
This is the same page showing the edit popup.


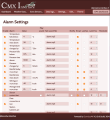
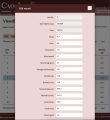
The Alarms settings page.
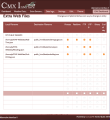
The extra Webfiles page. Note I put a heading in the first entry of every page to identify role of upload.

Showing the combined diary and current conditions editor.
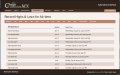
Showing the weather records.
Version 2 of this page enables you to re-order each block to suite your weather station resources
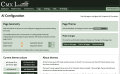
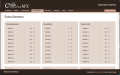
Build 3 showing the new AI Settings page


All the above are taken from my current Version 2 of the Interface except the last two.
Technical Changes
Generally, this has been limited to ensuring that all JavaScript files use the correct URL for API calls to both read and update settings / data. All modified JavaScript files are included in the AI package and do not over-write existing files.
Some of the html and associated js files have been renamed to satisfy my OCD nature.
This package also includes:
- The gauges.js file in the steelseries library - it has been modified to make to make the tooltips use the theme,
- The datatables and datatables editor library - again modified to make use of the themes.
- Finally the PopupOverley library for the same reasons.
Known Issues
At the moment I have not been able to make the AI open the Internet Settings ~ Web/Upload Site ~ Advanced Settings panel. As this is only for very specific issues you may well not need to access it, but if you do, then simply use the default interface until I post a solution.
Installation
Once you have downloaded the zip file, extract it somewhere other than your CumulusMX installation. This will avoid accidentally overwriting your existing Interface contents.
The Extracted package should consist of a single folder - ai2.cmx, which can then be copied into the existing Interface folder so it shows as a sub-folder.
You are then ready to start using it. If you use the url: http://localhost:8998/ to run your normal interface, you can simply add the folder name to the end like so: http://localhost:8998/ai2/. (Note the trailing backslash)
Of course localhost can be replaced with the IP address of the machine running CumulusMX. Using the IP address of your CumulusMX computer, you can also brows to it from another computer on your local network.
You still have access to the default interface if you want.
PLEASE read the included 'ReadMe' file as this shows how you can change the UNITS in the DayFile and Data Logs pages.