MX Administrative Interface
![]() This document is 'Work In Progress' so content may not be complete.
This document is 'Work In Progress' so content may not be complete.
Request for help from Wiki Readers
- Do you understand how MX works?
- Do you use hardware, or MX functionality, that is not yet documented? Can you begin that documenting?
- Can you contribute simple text for novice users, examples of what you have done, correction of typing or factual errors, or supply missing details?
- Will you make this page more useful by bringing content up-to-date as new releases change some information written for older releases?
- Does any page need a section for novices, so they don't need to read more technical information further down that page?
- Is there some information on this page, that should be on a separate page? Can you create the new page and move the less relevant information off this page, don't forget this page needs a link to the new page so people who expect to find it here know where it has moved to?
If you plan on contributing to the Wiki, then you will need an account.
- Please use the Request Account form to apply for an account. Note that the Wiki is currently undergoing restructuring and is largely locked for editing, but please apply for an account if you wish to contribute in the future.
- You will find help on how to contribute to this wiki at How to Edit.
- If you need to consult others, please use the Cumulus Wiki suggestions forum.
Please be aware that information on this page may be incorrect.
Terminology
This Wiki page has the title "MX administrative interface". That name is fully descriptive of the purpose of the functionality documented on this page. In subsequent references this is shortened to "admin interface".
Put simply this means the various pages you see in a browser that allow you to look at weather data and change settings.
When Steve Loft made his original cumulus software (legacy cumulus 1) available for others to use, it was natural for him to use "user interface" as a collective term for all the various screens that he included with that software.
When he worked on Cumulus 2 alpha builds, he needed to explain how the design of his new software was different, and he talked about it separating "engine" and "user interface". Basically, the engine read information from the weather station, calculated derivatives, and monitored extreme records. The user interface was a web server generated by the engine, here you could amend settings, and see those weather derivatives (the alpha Cumulus 2 never had ability to feed any information to an external web server).
Thus Steve Loft used the same terminology (engine and user interface) for his Cumulus 3 beta (also known as MX). When Mark Crossley took over development and brought MX out of beta, he added much more to the web server that the engine generated, and he talks about "the code" where Steve used "engine" and he uses "admin interface" for the enhanced collection of web pages generated by "the code" allowing you to do many administrative tasks like correcting log files (both data logs and extreme record logs). Since then, Mark has redesigned almost every page that Steve Loft created, so there is effectively nothing of the old "user interface" left, and "admin interface" therefore describes the new functionality better.
How to see and use the Admin Interface
- Type the URL which is displayed (when MX starts running) into your browser (replace the * with the IP address, or use 'localhost') and the admin interface should appear.
- As the admin interface can both display and change settings, it must not be exposed on the internet.
- However, it is available on the device running the MX code (engine).
- If the only web server running is the one generated by MX, you can replace the "*" shown by localhost
- The admin interface is also available to any device connected to your local (wired or wireless) network.
- In this case, what you type might be something like http://192.168.1.xy:8998
- You may need to look at your hub or router to see what to use for x and y as they represent the device where MX is running.
- If this is a 'clean' installation, i.e. you don't have an existing Cumulus.ini file defining station type and units to be used, the first thing you will need to do is to go to the settings screen.
- In this case, what you type might be something like http://192.168.1.xy:8998
- When that page is displayed it always shows the options to set the station type and units.
- Before you leave this page, you can make any other configuration settings by picking a section and clicking it to show the selections within that section.
- Now go to bottom of this page and click the 'Save' button.
Having set the station type, and other settings, you will need stop Cumulus MX and start it again.
If you have chosen to download and use the alternative Admin Interface (AI) it will be available using the url: http://localhost:8998/ai2/. All the information on this page also applies to the AI. For other information on the AI visit the Alternative Interface page.
What does the admin interface contain?
Essentially, the admin interface contains some web pages allowing you to view your weather data locally (there is an option in MX to upload data to a separate web server that might be provided externally). The data shown is provided via an "application programming interface" or api and that is described next.
The admin interface web pages that Mark has either added, or redesigned significantly, are those that allow you to edit the data log (.txt) files, to edit the extreme record (.ini) log files, and to input and modify configuration settings. These have changed a lot as Mark has developed MX, and the documentation of these later may not be kept up to date with the latest changes.
Weather pages
Dashboard
Mix of panels of text and gauges to show current conditions, and alarms
Now
Current data in tabular format
Gauges
Current data in SteelSeries Gauges format
Charts
Recent, Selectachart, Select-a-Period and historic graphs
Today/yesterday
Data for today-so-far, and yesterday in tabular format
Records
Data for this month-to-date, this year-to-date, all January months ... all December months, and all-time in tabular format
The API interface
The current data is transferred from the MX engine to the Admin interface as a JSON string accessed via a Application Program Interface (api).
To see the full content of the api for an individual web page in the admin interface,
- type into your browser the same IP reference as for the admin interface and
- add a few more items
- i.e. something like http://192.168.1.x:y/api/data/currentdata for the api that is how the current data (now.html) page in the admin interface gets its data
- there is more information on Local API page.
Again you may need to look at your hub or router to see what to use for x and y as they represent the device where MX is running.
Many browsers (e.g Firefox) allow you to specify the type of a file you want to view. So if you specify json as the type, this will make the browser show it in a long but fairly readable format.
Each table cell (on a admin interface page that lists your weather data in a tabular format), contains a span element. Each span element is given an id attribute whose value matches one of the items in the json stream coming via the api.
This same api can be used to get weather data into another device, although you may prefer to use MQTT instead as that is more easily customised to just share the few weather values you might want.
Technical aside
When reading the support forum (or articles in this Wiki), you may see mention of AJAX and Web Sockets. They are both methods of exchanging information between a web page and the data source, and explained below.
In the Cumulus MX context, they represent two ways of updating the data shown on an admin interface page like now.html or todayyest.html.
- Steve Loft's MX beta builds used different ports for the two methods, and allowed you to pick which ports were used and which way was used.
- Mark's builds use the same port for both methods, although there is still an optional parameter (when issuing the command to run MX) that can change the port used.
- The latest MX releases use web sockets for updating admin interface pages that you have open, as the "engine" is coded to send updated data on a regular interval (less often in newer releases).
Asynchronous JavaScript and XML (AJAX) is the widely used name for what Microsoft invented as XMLHttpRequest (late 1999, Internet Explorer 5.0). Now it is implemented in all browsers, and no longer purely a Microsoft feature. Put as simply as I can, it lets code (written into JavaScript) ask for updated information from the Cumulus MX engine to update the numbers on the web page. This is used in the data log editing pages to see if any line update has been successful.
In the legacy Cumulus 1, for its trends.htm web page, AJAX was used to load an updated graph into the web page each time the client pressed a button requesting a graph.
WebSockets is an improvement on AJAX. While AJAX needs the client to make a request before an update can be made, WebSockets adds the option that the source can generate the request and do a remote update. Thus when you open todayyest.html, the MX engine gets a request from that web page to insert the various sub-tables into that web page. Subsequently, when WebSocket use is enabled, the MX engine sends updates with new figures, until you close the web page and a Connection Closed message is sent instead.
The MQTT interface
Until this section is written, please see Cumulus.ini (MX 3.0.0 to 3.7.0)#MQTT for the information you can put into settings, and where to enter it.
The Data Log Viewing and Editing interface
![]() This section was written around the MX release in July 2020; that is no longer latest!
This section was written around the MX release in July 2020; that is no longer latest!
Appeal to contributors: Please work through all MX release announcements and work out all the many updates needed for this section, it may even need a redesign so it can correctly cover both past and more recent releases!
The Data logs tab in the admin interface, gives access to screens that can display the contents of 3 types of log files:
- The standard log file; there is one of these for each month - choose menu item Data logs (yes same name as tab)
- The Extra Sensor log File; there is one of these for each month - choose menu item Extra Data Logs
- The Daily Summary log file; there is only one of these - choose menu item Dayfile
This interface has changed in newer releases, and the information here may be out of date.
General points common to web pages for editing standard and extra sensor logs
For the first two web pages, but not the daily summary log web page:
- On this screen,you see a box for selecting the log you want to display. The default month and year (shown on loading the web page) is taken from yesterday's date. No log is loaded at start up. You can either type in a period (one or two digit representing month, then hyphen, then four digits representing year) or select year then click month in the data picker (this is produced by the bootstrap software MX uses, it is not the date picker provided by your browser), when you click on the month the box is updated with selected period.
- Next to it is a "Load" button. Press it and the Cumulus MX engine will generate an application programming interface (api) table containing a maximum of 10 lines taken from the log file selected and it is sent in dataTables software format to the web page.
Web page for editing daily summary log only
There is no need to select this log, the Cumulus MX engine will generate an application programming interface (api) table containing just 10 (at most) lines from log file and it is sent in dataTables software format to the web page.
General points common to all 3 web pages for editing all logs
For all 3 web pages
This interface has changed in newer releases, and the information here may be out of date.
The application programming interface only takes a copy of just 10 (or less if not all ten available) lines from log file and sends those to the admin interface.
The Refresh button will get the 10 lines currently displayed from the MX engine again. Useful if the log file is being updated by another process, or you wisely took a back up before you started editing, you have mucked up the editing, so you replace the original file with the backup and this button gets you access to the ten lines from that replaced copy. For the dayfile.txt, of course MX does a backup for you every day, so you could use that to replace a mucked up edit.
The dataTables software that shows the log on the web page includes pagination. The full (up to) ten lines received from the Cumulus MX engine are shown at a time.
- There is an icon to move to first page
- An icon to move to previous page (if there is an earlier page)
- A set of numbers, click a number (not all shown) to go to that page
- An icon to move to next page (if there is a later page)
- There is an icon to move to last page
When you choose another page, the api has to fetch the (up to) 10 lines for that page. These replace the dataTables insert you saw before
- When you select a line, two buttons are enabled:
- Edit - rather obviously brings up (by the altEditor software that generates it) a dialog (dataTables calls this a modal) showing all fields and letting you change the contents of most individual fields. Scroll down and in the footer are two buttons:
- Save will send the edited line back to the MX engine where the log file is then read into an array, and the relevant array element is replaced by the line received. After that the log file is overwritten from the amended array. After that the log file as a whole is converted back to dataTables format and returned by the api that delivered the table originally.
- Close. You can close this dialog in 3 ways:
- clicking that Close button
- Clicking the small x at the top right
- Clicking anywhere outside the dialog
- Delete - rather obviously brings up a dialog (known as modal by the altEditor software that generates it) showing all fields. Scroll down and in the footer are two buttons:
- The second Delete button on the modal will send the existing line back to the MX engine where the log file is then read into an array, and next MX deletes the relevant array element whose date matches the line received. At present, MX software in the engine does not check the times match! After that the log file is overwritten from the amended array. After that the log file as a whole is converted back to dataTables format and returned by the api that delivered the table originally.
- Close. You can close this dialog in 3 ways:
- clicking that Close button
- Clicking the small x at the top right
- Clicking anywhere outside the dialog
- Edit - rather obviously brings up (by the altEditor software that generates it) a dialog (dataTables calls this a modal) showing all fields and letting you change the contents of most individual fields. Scroll down and in the footer are two buttons:
Be aware
- The api expects the log file to contain all the fields defined in the version of MX that is being used.
- Lines in the log files created by earlier versions of Cumulus (Cumulus 1 or MX) may have fewer fields
- The way that MX has been written is inconsistent in the way it deals with fields that MX now expects but at the time that any log line was created did not exist. When adding the missing fields, some are added with empty string as content and some are added with a single space as content. When the editing modal is opened it may display placeholder text where a missing field is empty, but if you don't see that place-holder, there is probably a space included in the supposedly empty field (that you can't see), but that space (if not removed) could muck up any number you now want to store there.
- If you do edit a line, and then Save, then that particular line (but no others in the log file) will change its length to that used by the current version of MX and you will see additional trailing field separators (commas, semicolons, or whatever defined for your locale) in that line making it seem different from its neighbours. Again you may spot an inconsistency in content as some gaps may appear between delimiters where spaces have been added for fields that were originally missing.
As the name suggests, this menu contains various options for editing much of what Cumulus stores. However, to edit the Standard log files, Extra Sensor Files, or Dayfile.txt you need to use the "Data Logs" menu as described above.
Today's rain
Don't use this option near rollover. Decreasing rainfall amount here, increases the "start of day rainfall counter". It does not correct all rainfall information held by Cumulus, so you may need to make further edits, or wait until next day and see if any remaining issues.
See Editing rainfall in 'today.ini'
Weather diary
Allows text to be stored against dates, includes way of reporting snow (if falling, if lying and depth). See Weather Diary for general points and Diary.db for MX specifics.
Current conditions
Allows input of free text. Intended as way of getting that text onto your web site (via <#currcond> web tag. Note that this is temporary content, it is not retained.
Extreme editing
See Correcting Extremes page which covers using each of the menu selections listed below:
- All time records
- Monthly records
- This month's records
- This year's records
Changing Settings
![]() This section was written around the MX release in July 2020; that is no longer latest!
This section was written around the MX release in July 2020; that is no longer latest!
Appeal to contributors: Please work through all MX release announcements and work out all the many updates needed for these sections, they may even need a redesign so it can correctly cover both past and more recent releases!
All settings are stored in Cumulus.ini, so when you stop and restart MX, it can continue without you entering settings again. On that linked page, the settings are explained for each settings page, explaining which entry in the configuration file is affected.
Adjusting the majority of the settings is best done using these MX "admin interface" screens simply because for some settings the interface does validation (whilst editing the file directly could introduce invalid settings), you will see that Settings is the penultimate option in the navigation bar, and it has a drop down for the various settings screens that are now described.

- For most screens a HTML form element is used for editing, its content is determined by one JSON file, the allowed settings are fixed by a second JSON file, and there is a Save button to send the contents of that form for processing.
- That Save button must be clicked (and an acknowledgement displayed that the form processing has completed) before the edited settings are accepted by MX.
- Note that some settings take immediate effect, some settings are only read when MX starts, so it may be necessary to stop and restart MX to ensure your new settings take effect
- To make it easy to change settings, such setting screens uses tick boxes, radio buttons, and drop down selection boxes, so the choices available are clearly laid out.
- These form based MX settings screens do some validation, and if you make an error detected by the validation, the contents change to a red colour (red text and red boxes), that means invalid data is present which must be corrected before the form can be sent by pressing Save button.
- Generally, a whole section goes red, not just the item at fault (as determined by JSON file specifying valid options)
- One, or more, items on the page will have an error message added by the form processing in those validation fail cases, indicating porecisely which item(s) need(s) to be corrected.
If you attempt to set these settings by directly editing the file where they are stored, there is a danger of either making a typo or of choosing an illegal value for a particular attribute.
For older MX releases, some read only settings can not be found in any of the setting screens, for these MX cannot set the values, it can only read them. As MX cannot set the values, you need to edit the Cumulus.ini (MX_3.0.0_to_3.7.0) directly, and the referenced Wiki page identifies read-only settings that can only be adjusted by adding parameters directly in the file. The configuration article lists the read-write settings as well, and tells you what values are accepted for those attributes, and also explains some of the differences in the settings available between Cumulus 1 and MX.
Note that if you change settings, that some settings do not take effect while MX is running, while other settings do take effect instantly (The developer has not provided a list anywhere of which settings do, and which do not, take effect immediently, although sometimes a release notice mentions this for a new setting) - anyway, you may need to restart Cumulus MX to get the new setting picked up. When you exit MX, it saves the read-write settings in Cumulus.ini, and when you restart it it uses the read-only, and read-write, settings it reads from that file.
Program Settings
This sub-section is applicable from Release 3.9.4 - build 3099 onwards
![]() This section title was added for Release 3.9.4 - build 3099; that is no longer latest!
This section title was added for Release 3.9.4 - build 3099; that is no longer latest!
Please would somebody who has experience of this version amend this section. Please work through all MX release announcements and work out all the many updates needed for this page, it may even need a redesign for more recent releases!
The debug logging, data logging, and stop second instance options (each of which can be enabled or disabled) are on this page of the admin interface from version 3.9.4 onwards. For earlier versions, the same options are on the Station settings page and so described for that next section.
The other options on this page are new, and not available in earlier versions.
Station Settings
![]() This section was last updated for the MX release in July 2020; that is no longer latest!
This section was last updated for the MX release in July 2020; that is no longer latest!
Appeal to contributors: Please work through all MX release announcements and work out all the many updates needed for this section,
recent releases have totally changed the content of all settings pages in the admin interface,
consequently, the whole page may even need either a replacement set of pages, splitting of this page into multiple pages, or just a redesign of this section, for more recent releases!
Each setting has a hint beside it (with a small 'i' for information before each hint). If you have used Cumulus 1, the layout and section headings will be familiar. No settings takes effect until Save button pressed.
Like all the settings pages, there are headings with settings below them that are collapsed so click headings to see the items under them.
Please note that release 3.10.1 totally changed the station settings page (and others) compared to earlier MX releases. This Wiki page was originally written for release versions up to 3.6.0, and so the sub-sections covering earlier releases are better laid out than the sub-section covering release 3.10.1 onwards.
Please note that, in the Options section, there are two settings that take effect immediately Save is pressed, but are not written to Cumulus.ini when MX is closed, so will be reset when MX is restarted; these two exceptions are to use Debugging logging and to use Data Logging. The first adds extra output to the log file created in "CumulusMX/MXDiags" folder reporting in detail each output task MX does. The second adds extra output to the log file created in "CumulusMX/MXDiags" folder reporting in detail each input received from the weather station.
Release 3.10.1 onwards
The following list of options and allowed values is taken from StationOptions.json for release 3.10.2. You will not see all these options as certain settings determine which other settings are shown:
 Select Station :   "Davis Vantage Pro",  "Davis Vantage Pro2/Vue",  "Davis WeatherLink Live",
                        "Oregon Scientific WMR-928",   "Oregon Scientific WM-918", "Oregon Scientific WMR100",  "Oregon Scientific WMR200",
                        "EasyWeather",
                        "Fine Offset", "Fine Offset with Solar Sensors",
                        "Instromet",
                        "Ecowitt GW1000",
                        "LaCrosse WS2300"
  "loginterval":  "1 minute", "5 minutes", "10 minutes", "15 minutes", "20 minutes",  "30 minutes"
  "logrollover": "9am",  "Use 10am in Summer"
  "units":   "wind":  "Metres per second (m/s)",  "Miles per hour (mph)",  "Kilometres per hour (km/h)",  "Knots (kts)"
             "pressure": "Milli-bar (mbar)",      "Hectopascal (hPa)",     "Inches of mercury (inHg)"
             "temp": "Celsius",  "Fahrenheit"
             "rain": "Millimetres",  "Inches"
 "advanced": "Here be dragons! Only alter these settings if you understand what they do.",
              "tempdp","pressdp","raindp","winddp", "windavgdp", "windrundp", "airqulaitydp", "sunshinedp", "uvdp"
"Location": "A short name for the location", "A longer description of the location",  "Latitude",  "Longitude"
   "advanced": "Here be dragons! Only alter these settings if you understand what they do.",
                    "Records Began Date"

WEATHER STATION DEPENDENT
 "davisvp2": "Serial",  "TCP/IP", "Your station serial port (real or virtual)","Period to disconnect once a minute from IP loggers to allow them to upload to WeatherLink.com. Time in seconds"
      "advanced":  "Here be dragons! Only alter these settings if you understand what they do.",
                    "Synchronise station clock","Read Davis reception stats", "Set the Davis Logger interval to match Cumulus MX interval", "Enable use of the LOOP2 data packets (UseDavisLoop2)", "Davis VP 1-minute barometer update (ForceVPBarUpdate)","Time to wait after establishing a connection to an IP logger before sending commands","TCP/IP port for your logger. Default is 22222",  "Serial port speed in bps",
 "daviswll": "Auto-Discovery","api", "Select the ISS transmitter ID for your Wind sensor", "Select the ISS transmitter ID for your Temperature/Humidity sensor", "Select the ISS transmitter ID for your Rain sensor", Select the ISS transmitter ID for your Solar sensor", Select the ISS transmitter ID for your UV sensor", "select the transmitter ID for your extra temperature sensor #1, #2, #3, #4", "Select the transmitter ID for your extra soil moisture sensor #1, #2, #3, #4", "Select the index within the transmitter ID for your soil moisture leaf sensor #1, #2, #3, #4", Select the transmitter ID for your extra leaf sensor #1,#2", "Select the transmitter ID for your extra temperature/humidity sensor #1, #2, #3, #4, #5, #6, #7, #8", "Is sensor #1 a combined temperature/humidity sensor?"
    "advanced": "Here be dragons! Only alter these settings if you understand what they do.",
                "raingaugetype": "Auto",  "Metric (0.2 mm)*",   "Imperial (0.01 in)*", "Metric (0.1 mm)",  "Imperial (0.001 in)"
                "The UDP multicast port used by the WLL, this will normally be discovered from the WLL"
 "gw1000":  "Auto-Discovery",  "ipv4",  "macaddress"
 "fineoffset":  "Synchronise Reads",
      "advanced": "Here be dragons! Only alter these settings if you understand what they do.",
               "readtime", "vid", "pid"
 "easyw": "How often to read the EasyWeather data file in minutes", "filename" "minpressmb", "maxpressmb", "raintipdiff", "pressoffset"
 "imet": "comportname", "baudrate"
        "advanced": "Here be dragons! Only alter these settings if you understand what they do.",
               "syncstationclock",  "syncclockhour",  "updatepointer","waittime", "readdelay"
 "wmr928": "comportname"
"LaCrosse": "Use computer clock instead of LaCrosse station clock for archive data"

 "Options": "Use bearing zero when calm"", "Calculate average wind speed", "Use speed for average calculation", "Use 100% for 98% humidity", "Calculate dew point", "Cumulus pressure trend names", "Round wind speeds to the nearest whole number", "Display and log extra sensors, if fitted", "Make Cumulus MX run even if you do not have the minimum sensors required (temp, press, wind)"
       "advanced":  "Here be dragons! Only alter these settings if you understand what they do.",
                    "Period of time in minutes to average out wind bearings", "Period of time in minutes to average out wind speeds", "Period of time in minutes to record the peak gust speed"
 "Forecast": "Use the Zambretti forecast generated by Cumulus", "If using the Cumulus forecast, update only once an hour rather than every data update", "The low pressure extreme for your location", "The high pressure extreme for your location", "The units that you have used for the pressure extremes"
  "Solar": "Select the algorithm to use for solar irradiation calculations", "The percentage of the current theoretical solar value above which the sun should be considered to be shining (default = 75)", "The minimum solar reading for the sun to be considered to be shining (default = 0)", "The R-S transmission factor of the solar radiation through the atmosphere (0.70 - 0.91, default 0.80)", "The Bras turbidity factor (1.00=clear, 5.00=smoggy, default = 2.00)"
  "AnnualRainfall": "Enter a rainfall amount to be added to the total for the year when you started using Cumulus - for the period for which you have no Cumulus data",  "Enter the year to apply the correct to (normally this year or last year) as a four digit number. Leave as zero to disable", "Select the month from which the annual total is to be calculated",
  "Graphs": "The number of hours shown on the minute-by-minute graphs", "The number of days shown on the daily graphs"; SHOW/HIDE: "Outdoor Temperature", "Indoor Temperature", "Heat Index", "Dew Point", "Wind Chill", "Apparent Temperature" , "Feels Like", "Humidex", "Daily Maximum Temperature", "Daily Average Temperature", "Daily Minimum Temperature", "Outdoor Humidity", "Indoor Humidity", "UV Index", "Solar Irradiation",  "Sunshine Hours"
  "DisplayOptions": "Enabling this option will display Apparent temperature on the default web site/Disabling this option will display Feels Like temperature on the default web site", "Display Solar data", "Display UV-I data", "The number of cardinal points to display on the Wind Rose",
Station Type
Select the one that matches your weather station. If you are unsure, look at Supported Devices article because it explains how alternative brands are mapped to particular generic types.
Units
Steve Loft designed Cumulus 2, so the units you selected effected how a value was shown, but not how the value was stored. Consequently in Cumulus 2, you could change units at any time easily.
Cumulus 3 (MX) reverts to the approach used by Cumulus 1, the units you choose in the settings determine how values are stored, therefore you choose units when you first start MX and don't change them again (unless you are prepared to edit all the existing values in log files, including all the extreme records).
So for Cumulus MX, it does not matter what units the weather station uses, every reading is converted to units you select here, and generally every thing Cumulus does is based on those units. There is one exception, which only affects those users in USA; internally Cumulus uses Celsius for most calculations, if you have requested Fahrenheit, MX does a conversion from its internal values when writing entries in log files, web tags, and NOAA reports; that means if the weather station outputs in Fahrenheit, there is one conversion on reading the station, and a second conversion on output.
Davis Connection
As you will guess, here is where you enter settings for how Cumulus interacts with your Davis station, see hints by selections.
Davis WeatherLink Live
There are several sub-sections, see hints by inputs.
Ecowitt GW1000 Settings
For equivalent brands please see Supported Devices. See hints by selections.
Log interval
This is interval time (selected from a drop-down), i.e. the interval between one MX log of current values in the Standard log files and the Extra Sensor Files and the next entry in those logs.
- A shorter time interval here has advantage of a greater chance of logging daily maximum and minimum values, but leads to bigger files. Because the log only records spot values (not, as one Cumulus 1 enhancement requested, maximum and minimum since last log entry, which is the approach taken by one of Cumulus's software rivals) there remains a good chance of missing the extremes when logging.
- Conversely, choosing a longer time here increases that probability of missing extremes, but reduces the storage needs on the device running MX.
- For station types that don't have a separate logger, when MX is not running no weather data is captured, so the standard and extra sensor logs will only cover times when MX is running.
- If the weather station you use has a separate logger, setting the log interval here to match the interval used by the separate logger means that on restarting MX when it reads archive data during catch-up it will store spot values at the same interval whether storing archive or live data
- If the station logger interval and this log interval are set to same, then entries in the log files will be at same interval when MX is running and when the Cumulus log entries are populated from station log entries. If they disagree, the Cumulus log will store lines at the station logging interval during reading archive on restart and at the interval set here when MX is running normally; you might not want your Cumulus logs to have an inconsistent interval.
- The normal reason for disagreement between the MX interval and separate logger interval is when MX may be stopped for long periods; most separate loggers are cyclic, they overwrite older entries, so the interval for the separate logger is selected long enough to avoid any chance of over-writing during the period when MX is not running; whilst the MX interval is set short enough to maximise the number of spot readings stored.
- When MX is restarted and reads archived readings, Davis stations, in particular, can struggle to do a correct catch-up if the intervals do not match; with Davis stations MX can be forced to download every log in the logger and thus be stuck in reading archive stage for a long time.
- Calculations like average temperature (calculated by summing all processed measurements and dividing by number of samples) and wind run (calculated by summing all wind speeds and dividing by sum of all intervals between processed measurements) are biased if there is an inconsistency in interval between measurements being processed by MX. If you don't run MX all the time, it can only process what is in the station logger for the times when MX is not running. An average will be skewed (and so not an accurate average) if some of the inputs to that average are based on rapid sampling while MX is running, and some of the inputs taken from infrequent logs when MX is not running.
Davis users
From version 3.7.0 if you use a Davis station, a warning will be output if the log interval set here does not match the Davis logger interval. The developer says:
This is just a warning. Its best to keep the logger intervals the same to avoid excessively long start-ups, but it isn't mandatory.

I have put the warning in because lots of people aren't aware they have the issue.

Some people may choose to run with a MX interval of say 5 minutes and a station logger of 30 minutes because they say need to cope with extended offline periods. That is a conscious decision though, and they can ignore the warning.
To change the logging interval on a Davis to match the Cumulus logging interval:
- You can use the WeatherLink software if you have it,
- or use a terminal emulator connected to the logger and use the "SETPER xx" command where xx is the log interval in minutes.
Log rollover
Cumulus 1 was originally designed to allow you to match meteorological practice of rollover at 9 am in winter and 10 am in summer (so all days are exactly 24 hours long even when clocks change), but other options can be set.
Cumulus 2 worked on UTC, so the rollover functionality was different.
Cumulus MX operates on the time provided by the device it is running on, it offers a choice between midnight rollover, 9 a.m. rollover, and 9 a.m. rollover adjusted when daylight saving time is reported by the device. Only the last of the 3 options (or no DST) ensures all days are 24 hours long, the other options will have a day of 23 or 25 hours when clocks change (DST starts or ends).
Location
In this section enter:
- Latitude
- Longitude
- The above two are entered as degrees, minutes, and seconds, as this is most accurate way to specify an angular position (internally MX uses decimal degrees with 18 decimal places as 17 of those are needed for one arc second)
- You may need to look these up, don't forget there are 3 numbers (degree, minute, second) and a hemisphere option to select correctly for each
- The longitude and latitude must be right to get sun rise/set calculated correctly.
- Altitude (not used in standard Cumulus functionality, but must be right if you send an alternative pressure reading to an external site)
- Name
- Description
- The name and description are combined with other fixed words on the standard web pages, so must work in that context, and you are advised to look at the generated web page at CumulusMX/web/index.htm to check your choices work with those added words.
People often struggle with these settings. However, these are not settings you have to get right first time, so a mistake is a learning experience.
Options
You will probably find it hard to find this section as it is some way down on the Station settings web page, but it is an important set of settings.
Some settings offer choice from just two options as summarised in the table. The other Options settings are described below table.
This applies from Beta MX version 3.0.0 to release 3.9.2 - b3097 only
| Label | Not ticked | Ticked |
|---|---|---|
| Use bearing zero when calm | Reports bearing from weather station | Takes into account if wind is blowing, if it is not, the resting bearing is invalid |
| Calculate average wind speed | Use wind speed from weather station | Use rolling average of next selection to smooth out individual spikes |
| Use speed for average calculation | Use each 'latest' reading from weather station be it a gust or not for above calculation | Use the average wind speed output from weather station as input to rolling average above |
| Use 100% for 98% humidity | Report the humidity reading from station, even if station never reports 100% | Assume if station says 98 or 99, MX should report 100% |
| Calculate dew point | Use dew point from weather station (it can be calculated using lots of different formulae), if it is available | Use the formula MX has selected for calculating dew point (not same as Cumulus 1), select if weather station does not calculate dew point |
| Calculate wind chill | Use wind chill calculated by weather station (different formulas can be used) | Use the formula MX has selected for calculating wind chill (not same as Cumulus 1), select if weather station does not make its calculation available to MX |
| Synchronise station clock (DAVIS and INSTROMET only) | Don't worry if weather station clock gets out of sync with MX time. | Once a day try to ensure that weather station clock and MX time differ by less than 1 minute |
| Cumulus pressure trend names | Use what weather station reports as the pressure tendency | Let MX work out whether pressure is steady, rising/falling slowly, or rising/falling quickly, select if weather station does not make pressure trend information available |
| Davis VP 1-minute barometer update | Accept if weather station only updates pressure reading and trend information at quarter hour intervals | Force Davis station to update pressure reading and trend information every minute |
| Round wind speeds | Use wind speeds to the accuracy implied by the number of decimal places resulting from the conversion of reading from station to your chosen units | Express wind speeds in integers for your chosen units, rounding away decimal places resulting from unit conversion |
| Ignore LACROSSE clock | Use the time supplied by weather station when writing to standard log | Use the time supplied by device MX is running on when writing to standard log |
Extra Sensors - any sensors whose readings are logged in the standard log file are not extra. You tick here if you want Cumulus to log sensors using the extra sensors log file. Both log files are known as monthly logs in that a new log is created for each new month. (This is nothing to do with the special log that Cumulus 1 maintained for multiple temperature and humidity readings, as it is not available in MX).
Debug logging is used to switch on extra debugging information (about what Cumulus does in its processing) in the MXdiags_folder log file. It only remains on until either it is turned off here or Cumulus is closed. Use a parameter -debug for adding debugging when you start Cumulus if you want the debugging to persist.
Data logging is used to switch on extra debugging information (about interaction between weather station and Cumulus) in the MXdiags_folder log file. It only remains on until either it is turned off here or Cumulus is closed. Use a parameter -logging for adding data logging when you start Cumulus if you want the data logging to persist.
Stop second instance Invokes code that stops you having 2 copies of MX running at same time and conflicting.
Forecast
See tips by each setting.
Solar
See tips by each setting.
Annual Rainfall
The terminology here might be confusing, MX allows you to report seasonal rainfall, i.e. optionally what is reported as this year's rain starts on the first of September say, rather than 1 January. You choose by selecting a month a "Start of rainfall season".
However, the way MX has been written, does not fully implement this functionality, and users might not see the correct annual rainfall figure in all months of their season. MX calculates the figure it reports for this year's rain by summing:
- the rainfall it reports for today
- the amount in "year to date" entered here, if current calendar year matches the "Year to which year-to-date amount applies" entered here
- the amount in dayfile.txt (daily rainfall field) for each log file line starting with one with date matching First of month specified in "Start of rainfall season" and continuing to end of file.
If, you don't choose January here, there is a difficulty with the year-to-date and year to which it applies, because MX assumes the "year-to-date" is applied January to December of the "Year to which year-to-date amount applies" and will therefore incorrectly alter the this year's rain during parts of two different seasons! Consequently, as you go from December to January your "year-to-date" rainfall amount reported suddenly decreases; and when the month changes to that specified in "Start of rainfall season", you find the season re-starts with not zero rain but with this year's rain added in again!
The advice is to review these settings every month and check whether you want them to still apply or need to revise them.
Graphs
See tips by each setting.
Internet Settings
![]() This section was last updated for the MX release in July 2020; that is no longer latest!
This section was last updated for the MX release in July 2020; that is no longer latest!
Appeal to contributors: Please work through all MX release announcements and work out all the many updates needed for this section,
recent releases have totally changed the content of all settings pages in the admin interface,
consequently, the whole page may even need either a replacement set of pages, splitting of this page into multiple pages, or just a redesign of this section, for more recent releases!
All settings entered here are stored in Cumulus.ini. No settings take effect until Save button pressed.

Some settings don't take full effect unless, after saving the change, you restart MX. There is not yet a definitive list of which settings are only read when MX is started, but for example from build 3048 onwards the enable/disable Realtime FTP setting does not need a restart, but for earlier builds of MX it does.
All retain their settings when MX is restarted. No settings take effect until Save button pressed. This includes FTP logging in Web/FTP settings section, (it is not in this image as it is further down), which is used to add additional information to MXdiags_folder about standard File Transfer Process actions; it will persist across stopping and restarting MX, so you must switch it off here (or with MX stopped within Cumulus.ini FTP site section.
The MX settings on this web page have a lot of similarities with the Cumulus 1 settings
- this MX web page does not cover all of the Cumulus 1 Internet Settings.
- MX has more options than Cumulus 1 had,
- some defaults are different in the two flavours.
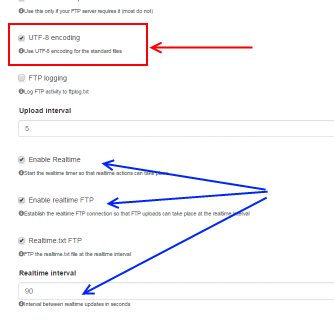
Admin Interface: Settings Menu: Internet settings: Web/FTP settings
![]()
- Click on this heading to expand settings as per illustration.
- Auto update
- Tick this to enable updates to a web server by MX. (Don't tick it if you don't have any web space).
- Include standard files
- Standard files are the web page templates in the web folder, each file as a name ending in "T.htm". Tick here if you want those files to be processed by MX and uploaded at standard web interval to the host and directory we have set earlier.
- Include graph data files
- These are files with an extension ".json" and MX generates these automatically, storing them in the web folder. Tick here (as arrowed) if you want those files to be processed by MX and uploaded at standard web interval to the host and directory we have set earlier.
- Include Moon image file
- We first need to set (later on this same settings page) that MX is to use system drawing to produce "moon.png" in the same web folder from "MoonBaseImage.png" in that folder. The base image is of a full moon, MX uses system drawing to generated a masked version of this image every hour that reflects the current phase of the moon and stores that in "moon.png".
- With "moon.png" being generated, we can tick here to include the new image in an upload by FTP every hour.
- ActiveFTP mode, FTP rename, Delete before upload
- Please be guided by the tips below these selections on the settings page.
- UTF-8 encoding
- Cumulus supports just two encodings, please see Encoding section in another article for more information. Here just tick this selection for standard web pages.
- FTP logging
- Normally, this is left unticked, but if you want to check MX is uploading (and you use the simple FTP protocol), you can tick this for every FTP transfer to be logged to MXdiags_folder.
- Upload interval
- Standard web pages are updated on the hour and every x minutes thereafter, where x is the number you enter here. Most people would choose 10, 15, 20, or 30, here depending how much uploading they want, and how up to date they want the displayed information to be.
- As an aside, if you are not using the standard web pages, many third party web pages use ajax (don't worry about what that is) to allow some of the web page content to be updated far more frequently than the actual web pages get uploaded.
- The realtime settings are only needed for the gauges page and settings depend on your MX version, right hand picture is Cumulus MX settings screen)

From build 3042, MX automatically uploads the realtimegauges.txt file.
Note that the realtimegaugesT.txt file for MX is slightly different to the one for Cumulus 1, and it is important to use the one supplied with MX for MX.
You have now told Cumulus how to update your web space with the Standard Cumulus Template files for the web.
ADDITIONAL INSTRUCTIONS FOR OLDER MX BUILDS:
Prior to build 3042, you also need to specify an extra file in the table for the steel series gauges page to work:
- 'Local filenames' column
- Enter the path and filename for the realtimegaugesT.txt file where shown by red box. This will normally be web\realtimegaugesT.txt on Windows, and web/realtimegaugesT.txt on other platforms.
- 'Remote filenames' column
- The green box shows where you must type the path to where you want the web page to appear (i.e. where the other web pages are uploaded to) ending with the file name realtimegauges.txt. Typically the path will involve specifying the directory you entered on the 'Sites/Options' tab (see the 'Web Site' settings step 3 for that tab above).
- 'Process?' column
- Select this (ringed in purple), as realtimegaugesT.txt contains web tags and needs to be processed to create the remote file.
- 'Realtime?' column
- Select this (ringed in purple), only if you want the file to be created at whatever interval you have defined for real-time updates (see 'web settings' point 7 above for where you did that); otherwise it will be updated on your web site at the normal updating interval.
- 'FTP?' column
- Select this (ringed in purple) if the destination is remote (don't select if the destination is local).
- 'UTF-8?' column
- This is irrelevant for this file.
Other Internet Settings
While Cumulus 1 only supports standard FTP, MX supports that plus SFTP and FTPS. Which you select depends on your web site, it might be that you used a tool to manually upload files and so you can copy settings from that tool into the MX settings.
Like Cumulus 1, MX has an External Programs section. Here you can enter a command and (in separate box) parameters for 3 possible timings (at real-time, at interval, and at end of day). Typically, on a windows device you would enter the name of a batch file (filename ends in .cmd). On a device running Linux, it could be a shell command file (ends in .sh) or indeed a command like "php" to run a php script whose name is specifed in parameters box. The final parameter might be preceded by ">" to direct the output to a log file.
- In Cumulus 1, you had one setting to upload the standard files (web pages) and a second setting to upload the standard images (moon image, and the graphs)
- MX has one option for the "uploading the standard files" (web pages), a second option "include graph files" (JSON files used by charts), a third option for "generating the moon image", a fourth option for "uploading the moon image". See image where the graph file option is arrowed.
Each section for an external web site has a number of parameters to set, once set MX will automatically upload to that site the weather values in the correct format. Windy has been added to the external web sites that can be automatically updated.
The main new feature (not in Cumulus 1) within this settings page is a Custom Http section. Within here you can define commands (in URL format) to be executed either at some multiple of seconds interval, and/or at a selected intervals in minutes, and/or at end of day (in EOD sequence shown below, the Custom HTTP is run before external programs are run, and that is before upload of Extra Files at EOD).
- In each of these you can use web tags to supply values for parameters to the command.
- Typically this would be used to send information to a remote web server.
- Here is a Custom HTTP example
https://the_URL_here/your_api_here?winddir=<#avgbearing>&windspeedmph=<#wspeed>&windgustmph=<#wgust>&tempf=<#temp>&rainin=<#rhour>&baromin=<#press>&dewptf=<#dew>&humidity=<#hum>&uv=<#UV>"
- No settings take effect until Save button pressed.
- You need to turn on enhanced debug logging to see a confirmation that the http has run such as that shown here:
2018-07-21 16:05:00.821 Custom HTTP Minutes update
2018-07-21 16:05:01.037 Custom HTTP Minutes response: OK: ok! (24.2)
Extra Web Files
This is an extension of the Cumulus 1 facility on the "Files" tab of its Internet Settings.
How to use these settings is explained for both Cumulus flavours on this wiki page, MX has an extra "end of day" (EOD) option, but otherwise you fill it out exactly the same way. Settings in one table cell are stored when you click in another table cell.
- Local Filename
- Enter here something like "<currentlogfile>" or "./web/moon.png" or "./data/dayfile.txt" or "./webMX/realtime-xT.txt"
- You will see that "./" specifies the folder where CumulusMX.exe is stored, and you can refer to sub-folders within it that MX provides or for non-standard files that you have added
- Destination Filename
- You can put a path to somewhere else on the device running MX here, or a path from your FTP root on your web server.
- Always enter a full path and file name, but you can incorporate in what you put here any of the constants that MX provides (which are "<currentlogfile>" and "<currentextralogfile>" and "<airlinklogfile>")
- Process
- You tick this box if, and only if, the file specified in Local Filename is a Cumulus Template file, i.e. it contains Cumulus Web Tags.
- A template file can have any file extension you like (e.g. .tmpl or .cum can be used in Local Filename) and used to generate any of these file types: .htm, .html, .js, .json, .php, .txt (used in Local Filename)
- Realtime
- Only available if you have selected "Enable realtime" in the Internet Settings page as described above
- You tick this box if you want the local filename read, and the destination filename created at the interval you have set up for real time processing
- FTP
- Only available if you have defined host and other settings for FTP, SFTP, or FTPS, in the Internet Settings page as described above
- You tick this box if you want the file to be transferred using the defined settings
- UTF-8
- For the content of files to be understood they must use the right Encoding. You can follow the link for the full technical explanation.
- For non-technical people, tick this whenever you leave the next box un-ticked, it is safest as this signifies the modern standard encoding
- Binary
- You tick this box if what you are uploading is for example an image file (.jpeg, .png, and many others) or complied code
- You leave this box without a tick if what you are uploading is text (any of these file types: .htm, .html, .js, .json, .php, .txt)
- End of day
- You tick this box if you want the local filename read, and the destination filename created when Cumulus is processing the end of any meteorological day
- Note that if neither Realtime nor End of day are ticked, the local filename is read, and the destination filename created when Cumulus is processing the Standard Upload Interval as defined by your settings
- Although to tick both real-time and end-of-day (EOD) seems nonsensical, MX will let you tick both for any selected file(s), as it will then do any processes, and uploads, at both intervals. I don't see why you should do that for normal running, but you might tick both to test a template without waiting for EOD, and after it has been processed once, remove the unwanted real-time tick, so from then onwards it just happens at EOD
Although, there is no Save button (as clicking in another cell stores previous edit), you can optionally press the "Enter" button (as labelled on many keyboards) to be sure you have saved all edits made before you leave the web page.
Been using legacy Cumulus?
If you have moved from Cumulus 1, and are therefore using an existing Cumulus.ini, these screens may be partly pre-populated, but because MX adds extra options you might need to:
- change some paths in local column, (if your Cumulus 1 and your MX locations are different)
- if you have moved to a Raspberry Pi, or other Unix-derived operating system, remember that path names in Microsoft Windows operating systems use "\" as directory separator, but all other systems use "/".
- There is more advice available at MX_on_Linux#Configuration_files.
- untick one column, and tick another, now that End of day is an option for the timing as well as real-time and (normal uploading/ftp) interval.
- edit some templates (local files) where the process column is ticked because of Web tags differences (some output modifiers are interpreted differently), you will need to revisit every web tag in every template to check whether the output format will need to be added, or amended, to give the output you want.
- you should not need to change remote file names, providing that you have not changed any directories on your web site as (like in Cumulus 1), for extra files, the remote path/file name required ignores any directories specified on Internet Settings screen for FTP settings.
- if you host your own web server, then you might need to change remote paths, if you have moved your server to a new device
- if you use a web server provided by a hosting company, and you change to a different company or they update their offering, then again you might need to update remote column
- the exception to this is if either you host your own web site and/or you are moving them web site to a new location; in these cases your remote file paths may need updating.
Calibration settings
This is identical to Cumulus 1 screen functionality, already explained in Cumulus 1 FAQ here and for MX described in Spike removal section of this Wiki.
NOAA report settings

The various settings available on this screen are explained here.
Just a quick reminder here that while Cumulus 1 is case insensitive for the code for the different ways to specify a month, MX only accepts upper case ('MM' for digits, 'MMM' for 3 letter month etc.), read more about the naming here.
MySQL settings
![]() This section was last updated for the MX release in July 2020; that is no longer latest!
This section was last updated for the MX release in July 2020; that is no longer latest!
Appeal to contributors: Please work through all MX release announcements and work out any updates needed for this section,
recent releases have totally changed the content of all settings pages in the admin interface,
consequently, the whole page may even need either a replacement set of pages, splitting of this page into multiple pages, or just a redesign of this section, for more recent releases!
Cumulus MX includes functionality not in Cumulus 1, and this is one example of a new feature. It is designed to automate updating of MySQL databases whose schema has each table based on one of the Cumulus log files. This MX feature was developed from this script for Cumulus 1.
IMPORTANT
- The MX automatic standard updates described below only work if the database table they are updating has columns named exactly as defined in the standard update.
- The order of those columns does not matter, both CumulusMx.exe and ExportMySQL.exe use column names in their INSERT IGNORE statements.
- All the MX updates will work even if you have defined additional columns in the standard tables and update those in a separate process.
- But when extra columns are added as at versions 3.6.0 and 3.7.0, the MX updates will NOT work unless you have added the extra columns introduced in those releases with correct names.
- For those releases, the release announcement includes a script to run to add the extra columns needed for those (and subsequent) releases.
Brief background on SQL
It was IBM who first invented the concept of Relational Databases in the 1970s and they needed a language for all aspects of interaction with the new database and they called it Structured (English) Query Language. The brackets indicate the word that was later removed. You may find when SQL is talked about, it is either pronounced "sequel" (as if there is still a "E" after the "S") or the 3 letters are simply spelt out.
- SQL is not Structured in the modern computing usage of that word concerning languages that can implement decision trees; instead the word structured here comes from the ability to make a query from a main query and a sub-query, although for some people it is a useful reminder that the key words must appear in a particular order.
- SQL is not just for running Queries, it can give and revoke access permissions, create and drop tables, and do many more tasks than just query a database to get results.
- SQL is a Language as it does have a set vocabulary, a defined sequence in which key words must appear, and it is used for describing tasks to a database.
A relational database has to satisfy a number of conditions, but the basic one is that all data appears in a table with rows and columns. The columns have a particular order, but there is no control over the order of rows, so you can't specify a row number, you either specify a primary key that identifies a particular row, or you specify a sort by the value in any column in a particular order and SQL then returns your selected rows in that sorted order.
Like happened with video recorders and browsers, there was a relational database war, and thus division in language adoption, in the 1980s between 2 big players IBM's SQL and Ingres' QUEL, each gaining popularity in different ways, but the latter lost out, with newcomer Oracle taking the lion share of the commercial usage of SQL soon so very widely adopted, it achieved world dominance. There were a number of minor players who implemented their own relational databases, and initially their own languages, but SQL obtained a ISO definition in 1985 and was then widely adopted, surviving the invention of the internet, and the move from mainframes to small devices.
MySQL is one of the rivals, but all versions of SQL are related and the dialect differences are comparatively minor compared to the commonality of the majority of the language. SQL is designed to be largely independent of how data is stored, so from 2000 as per newer standard for SQL, it now works with XML as well as relational databases. That said, because it can define creation of columns, some SQL code is dependent on how data is stored in a particular database system.
Implementation
Mono and .Net implement SQL capability, and this is utilised by Cumulus MX in the queries it generates. However, for SQL to work on your web site, you need to have a relational database available on your web server that accepts the MySQL that MX generates. It is worth saying that one difference between MySQL and the SQL standard is the former can insert multiple rows in one MySQL statement, but in the standard for SQL the specification says only one row can be inserted by one statement. Having made that clear, the SQL that is generated by the MX engine does only insert one row at a time, so the SQL MX generates is standard SQL.
MX does not include a database to install on your web site. Note, this does not mean your web server must have a MySQL database, as other products will understand the updating SQL (because of the dialect, commonality, and standard-meeting points I have just made), so the automatic updating should always work. One common difference between products is which data types available, so it is just possible that you might have a database that does not understand the column definitions in the MX option to create a table for you using MySQL dialect, so do be prepared in case you have to create each table yourself using a different method, the SQL to create a table is fairly simple, it even starts "CREATE TABLE table_name", but it is the list of columns with their data types and sizes that follows that is tricky if you don't know what is allowed on the database you are using.
Equally, the separate application, ExportMySQL.exe mentioned in its context below, includes SQL to create a table (with MYSQL data types) and add multiple rows in one instruction, so it is only able to work with databases that use MySQL (the clue is in the name of the application), or databases where the tables have already been set up so it is just issuing Insert Ignore SQL.
Mandatory section
- Server Details - expand this drop down as it is used for essential information for any access to the database on your web server:
- Enter your host name or a IPv4 address for your web server. If you host your own server, it might be something like 127.0.0.1. It will be the same as you enter for host in the "internet settings" screen.
- Enter the port for communicating with database server e.g. 33106. (Your web server provider should tell you whether the port is this or another number)
- Enter the User Name for updating your database. (You may be able to set up user names on your database with different permissions, you need to state here one with updating permissions)
- Enter the password for updating your database. (This will be set up for each user name)
- Enter the name of the database that holds the tables you wish to update. (You probably have set this up, ask your provider if you need help)
Optional Sections
The remaining 6 drop-down sections are optional, you choose which you want to use, they appear on the screen in a different order to how I explain them below.
- Some of the optional settings described below, allow you to choose which log file to use for such automatic updates and what to call the table uploaded to (uploads will not work before the required table has been created).
- Alternatively, you can devise your own schema, create that table, and then write the SQL to update your table using web tags to supply all the values.
- You need to turn on enhanced debug logging to see any confirmation that the standard or custom SQL has run. With enhanced logging you will see messages like:
2020-04-09 10:00:01.047 MySQL: 2 rows were affected.
Standard Daily Summary Table
- 1.Dayfile.txt upload
- This section is about uploading to a database table that contains one row for each day.
- This feature takes the set of values that MX has just used for the line added to this log file at the end of the day, and soon afterwards inserts those same values into a new row (with columns named as per SQL example below) in a database table.
- If you don't have a table in your database for this upload (skip to step after SQL if you do), first
- Choose Table name - the default table name is "Dayfile", but you can choose any other name
- Now move down the screen and click the Save button, and wait for MX to pop up Settings Saved message
- Now find "Create database table" section below the Save button and click Create Dayfile.
- MX will confirm when table has been created.
- This will create the table using the following SQL (here using default table name) (the feels like columns were added in MX version 3.6.0):
CREATE TABLE Dayfile (LogDate date NOT NULL ,HighWindGust decimal(4,1) NOT NULL,HWindGBear varchar(3) NOT NULL,THWindG varchar(5) NOT NULL,MinTemp decimal(5,1) NOT NULL,TMinTemp varchar(5) NOT NULL,MaxTemp decimal(5,1) NOT NULL,TMaxTemp varchar(5) NOT NULL,MinPress decimal(6,1) NOT NULL,TMinPress varchar(5) NOT NULL,MaxPress decimal(6,1) NOT NULL,TMaxPress varchar(5) NOT NULL,MaxRainRate decimal(4,1) NOT NULL,TMaxRR varchar(5) NOT NULL,TotRainFall decimal(6,1) NOT NULL,AvgTemp decimal(4,1) NOT NULL,TotWindRun decimal(5,1) NOT NULL,HighAvgWSpeed decimal(3,1),THAvgWSpeed varchar(5),LowHum decimal(4,0),TLowHum varchar(5),HighHum decimal(4,0),THighHum varchar(5),TotalEvap decimal(5,1),HoursSun decimal(3,1),HighHeatInd decimal(4,1),THighHeatInd varchar(5),HighAppTemp decimal(4,1),THighAppTemp varchar(5),LowAppTemp decimal(4,1),TLowAppTemp varchar(5),HighHourRain decimal(4,1),THighHourRain varchar(5),LowWindChill decimal(4,1),TLowWindChill varchar(5),HighDewPoint decimal(4,1),THighDewPoint varchar(5),LowDewPoint decimal(4,1),TLowDewPoint varchar(5),DomWindDir varchar(3),HeatDegDays decimal(4,1),CoolDegDays decimal(4,1),HighSolarRad decimal(5,1),THighSolarRad varchar(5),HighUV decimal(3,1),THighUV varchar(5),HWindGBearSym varchar(3),DomWindDirSym varchar(3),PRIMARY KEY(LogDate,
'MaxFeelsLike',   'decimal(4,1)' ,'TMaxFeelsLike',  'varchar(5)','MinFeelsLike',   'decimal(4,1)','TMinFeelsLike',  'varchar(5)' ) COMMENT = "Dayfile from Cumulus"
- With the table existing, all you need to do is:
- Enable - tick here when you are ready for this action [using the schema (set of column names) in the SQL quoted above] to happen at end of day
- Now move down the screen and click the Save button, and wait for MX to pop up Settings Saved message.
- Now, to populate your table with past rows:
- If you are using Windows, open a command window in the folder where "CumulusMX.exe" is found. Type ExportMySql.exe dayfile
- If you are using another operating system, send the following instruction to the terminal in the folder where you installed MX. sudo mono ExportMySql.exe dayfile
- At the end of the meteorological day, MX will now automatically run the SQL to add a new row with the daily summary values as mentioned at the start of this section.
Another daily summary table
- 2. Custom upload - at rollover
- Use this option with caution - I found that when I ran MX on a Windows PC, this feature worked (although I abandoned it as it did not do all I wanted), but when I tried this feature with MX running on a Raspberry Pi it simply did not work (the first few web tags used reported correctly the values from day that had just ended, but subsequent web tags, from dew point in example below, were useless as they reported the values from first minute of day just starting - the SQl runs in a separate thread in MX to that handling web tags and it appeared the web tags rolled over before the SQL finished even being defined by MX!
- In the previous option, you have no ability to vary the schema (which columns are updated), it will update a column for Total Evaporation even if your weather station cannot calculate that. It will update columns for total hours of sunshine, highest solar radiation level, and the maximum UV in the day even if you cannot measure these. It will not update columns for other parameters that Cumulus processes like Lightening, Soil Moisture, pollutant values, Chill Hours, for whether snow was falling or lying, or the depth of snow if you wanted to be recording those in your daily summary.
- MX provides this alternative option, again doing an upload as part of roll over to next day (sequence shown below, the Custom EOD SQL is run after the day reset to new date.
- In this section you can specify the schema, and say which columns are to be updated with three selections:
- Save - a button after all option sections, until you click it any changes you make in this section have no effect
- A tick box to enable or disable this upload (so you can leave the SQL recorded, but stop running it when you like.
- The SQL you want to run, what you type in this small text box should include INSERT IGNORE (or REPLACE) to insert a row, or include UPDATE to change columns in a row that already exists, like any SQL it must include the name of the table, the columns to be updated, and the values you want to insert into the columns are either expressed as web tags, as SQL functions on web tags, or as a sub-query reading the values from somewhere else.
- Here is an example of a suitable query that MX can process for you
- [note includes yesterday tags e.g. for primary key <#metdateyesterday format=yyyy-MM-dd>, but as caution above says it might, or might not, process correct web tag content so other web tags migt also need to be yesterday versions),
- I have used the SUBSTRING function at one point,
- as it is a custom update the column names listed here are different from the standard example
- I don't have a sub-query in this example, but any SQL that is syntactically valid could appear here, and you could have more than one query in sequence.
- Here is an example of a suitable query that MX can process for you
INSERT IGNORE INTO `test_daily_summary` (`MaxRainRate`, `TMaxRainRate`, `HighHourRain`, `THighHourRain`, `TotRainFall`, `SnowFalling`, `SnowLying`, `SnowDepth`, `CumChillHours`, `LogDate`, `RollOver`, `MinTemp`, `TMinTemp`, `HeatDegDays`, `AvgTemp`, `MaxTemp`, `TMaxTemp`, `CoolDegDays`, `LowDewPoint`, `TLowDewPoint`, `LowHum`, `TLowHum`, `HighHum`, `THighHum`, `HighDewPoint`, `THighDewPoint`, `GreatWindChill`, `TGreatWindChill`, `LowAppTemp`, `TLowAppTemp`, `HighAppTemp`, `THighAppTemp`, `HighHeatInd`, `THighHeatInd`, `MinPress`, `TMinPress`, `MaxPress`, `TMaxPress`, `HighAvgWSpeed`, `THighAvgWSpeed`, `StrongestWindGust`, `TStrongestWindGust`, `BearStrongestWindGust`, `BearStrongestWindGustSym`,`BearDomWind`, `BearDomWindSym`, `TotWindRun`) VALUES ('<#rrateTM>', '<#TrrateTM>', '<#hourlyrainTH>', '<#ThourlyrainTH>', '<#rfall> ', '<#snowfalling>', '<#snowlying>', '<#snowdepth>', '<#chillhours>', '<#metdateyesterday format=yyyy-MM-dd>', '(1 * SUBSTRING(<#rollovertime>,0,2))', '<#tempYL>', '<#TtempYL> ', '<#heatdegdays> ', '<#avgtemp>', '<#tempTH>', '<#TtempTH> ', '<#cooldegdays> ', '<#dewpointTL>', '<#TdewpointTL>', '<#humTL>', '<#ThumTL>', '<#humTH>', '<#ThumTH>', '<#dewpointTH>', '<#TdewpointTH>', '<#wchillTL>', '<#TwchillTL>', '<#apptempTL>', '<#TapptempTL>', '<#apptempTH>', '<#TapptempTH>', '<#heatindexTH>', '<#TheatindexTH>', '<#pressTL>', '<#TpressTL>', '<#pressTH>', '<#TpressTH>', '<#windTM>', '<#TwindTM>', '<#wgustTM>', '<#TwgustTM>', '<#bearingTM>', '<#directionTM>', '<#domwindbearing>', '<#domwinddir>', '<#windrun>', '<#feelslikeTH>','<#TfeelslikeTH>','<#feelslikeTL>','<#TfeelslikeTL>','<#humidexTH>','<#ThumidexTH>');
- Again before you enable this option, there is a facility lower down this setting page (under the heading Create database table) where you can type some SQL to be run immediately, that can create the table you want this option to update, (although it could even populate any table with historic data, it is only intended for a small query). I am using a table that already exists as I have used it for testing changes to my PHP scripts, so I did not need to create a table before I enabled the query shown above.
Standard Monthly table
- 3.Standard log file upload
- Cumulus starts a new log file for each new month, that is why this is called the monthly log.
- This database table has one row for each line in any monthly log and therefore the same table contains all months.
- This feature takes the set of values that MX has just added to the monthly log file, and soon afterwards if this feature is enabled, MX inserts those same values into a new row in a database table.
- If you don't have a table in your database for this upload (skip to step after SQL if you do), first
- Choose Table name - the default table name is "Monthly", but you can choose any other name
- Now move down the screen and click the Save button, and wait for MX to pop up Settings Saved message
- Now find "Create database table" section below the Save button and click Create Monthly.
- MX will confirm when table has been created.
- The SQL used to create the table is (columns marked NOT NULL have been in use for all Cumulus versions, the other columns have been added from various different versions)
CREATE TABLE Monthly ('LogDateTime', 'DATETIME NOT NULL', 'Temp', 'decimal(4,1) NOT NULL', 'Humidity', 'decimal(4,1) NOT NULL',
'Dewpoint', 'decimal(4,1) NOT NULL', 'Windspeed', 'decimal(4,1) NOT NULL', 'Windgust', 'decimal(4,1) NOT NULL','Windbearing' 'smallint(3) unsigned zerofill NOT NULL', 'RainRate', 'decimal(4,$rainDec) NOT NULL', 'TodayRainSoFar', 'decimal(4,$rainDec) NOT NULL', 'Pressure', 'decimal(6,2) NOT NULL', 'Raincounter', 'decimal(6,2) NOT NULL', 'InsideTemp', 'decimal(4,1) NOT NULL', 'InsideHumidity', 'decimal(4,1) NOT NULL', 'LatestWindGust', 'decimal(5,1) NOT NULL', 'WindChill', 'decimal(4,1) NOT NULL', 'HeatIndex', 'decimal(4,1) NOT NULL', 'UVindex', 'decimal(4,1)', 'SolarRad', 'decimal(5,1)', 'Evapotrans', 'decimal(4,1)', 'AnnualEvapTran', 'decimal(5,1)', 'ApparentTemp', 'decimal(4,1)', 'MaxSolarRad', 'decimal(5,1)', 'HrsSunShine', 'decimal(3,1)', 'CurrWindBearing', 'varchar(3)', 'RG11rain', 'decimal(4,1)', 'RainSinceMidnight', 'decimal(4,1)', 'WindbearingSym', 'varchar(3)','CurrWindBearingSym', 'varchar(3)', 'FeelsLike', 'decimal(4,1)') COMMENT = "Monthly logs from Cumulus";
- With the table existing, all you need to do is:
- Enable - tick here when you are ready for this action [using the schema (set of column names) in the SQL quoted above] to happen automatically.
- Now move down the screen and click the Save button, and wait for MX to pop up Settings Saved message.
- The upload you select here will happen every time MX creates a new line in the monthly log file, it might be every 10 minutes, but you may have configured a different interval.
- Separately, to populate your table with past rows:
- If you are using Windows, open a command window in the folder where "CumulusMX.exe" is found. Type ExportMySql.exe monthly
- If you are using another operating system, send the following instruction to the terminal in the folder where you installed MX. sudo mono ExportMySql.exe monthly
Table created from items updated at standard interval
- 4. Custom upload - minutes interval
- One way you could use this option, is to replace the monthly log file upload if you wanted to change the schema, by leaving out some columns if your weather station is not able to measure all the derivatives included in the standard schema.
- You could use this option to add columns that represent fields in your Extra Sensor log file, by specifying the corresponding web tags
- This feature allows you to specify your own SQL for an upload to be repeated every NN minutes. Unlike the Monthly log file upload option you choose what schema (columns) are in the table that you are uploading a new row to and indeed exactly what SQL is used.
- Apart from the need to press the Save button that follows all the options, there are 3 items just for this option:
- A tick box to enable or disable this upload (so you can leave the SQL recorded, but stop running it when you like.
- The SQL you want to run, it should include INSERT IGNORE (or REPLACE or UPDATE) to insert/replace/update a row, include (as all SQL needs) the name of the table, include the columns to be updated and include the values either expressed as web tags or derived from a sub-query.
- A drop down for the number of minutes between runs, the default is 10, but if your weather station updates less frequently, maybe you will choose 15, 20, 30, or 60 as the interval out of the 11 available in drop down.
Table updated at real time interval
- 5. Realtime.txt upload
- Cumulus MX can be set to recreate a file called Realtime.txt on a very frequent basis. The real time interval defines the time from the end of doing one real time update until the start of the next real time update. The file is recreated, in that unlike other log files, MX does not add new rows in each update, the file only ever contains a single line of values.
- MX does not use this realtime.txt file in any of its supplied components, so that file by default is not available on your web server.
- There is the ability elsewhere (Internet Settings screen) to upload this log file to your web server, should you wish to use it. The most common use is as a source for Ajax (JavaScript based) updating of web pages on the same very frequent basis.
- The option being described here is an alternative to having that log file on your web server, instead MX in this option MX updates a database table, adding a new row at the same very frequent interval.
- In this standard option, where you cannot specify which columns to include, MX will put into a database table row, the same set of values it would put into that log file on recreation.
- It is important to stress, this database table has rows added, so it is not equivalent to the uploaded file that contains a single line.
- Cumulus MX can be set to recreate a file called Realtime.txt on a very frequent basis. The real time interval defines the time from the end of doing one real time update until the start of the next real time update. The file is recreated, in that unlike other log files, MX does not add new rows in each update, the file only ever contains a single line of values.
- If you don't already have a table in your database with the right columns for this upload, first
- Choose Table name - the default table name is "Realtime", but you can choose any other name
- Now move down the screen and click the Save button, and wait for MX to pop up Settings Saved message
- Now find "Create database table" section below the Save button and click Create Realtime.
- MX will confirm when table has been created.
- With the table existing, there are 3 steps left:
- Enable - tick here when you are ready for this action of creating new rows to happen automatically.
- Enter in the text box a retention string in format retainVal=NNN retainUnit=XXXX where NNN is a number from 1 to 3 digits long, and XXX is a time unit e.g. second, minute, hour, day, week, month, quarter, or year.
- Because the updates are so frequent this database table grows very quickly, and you need to say when it should delete the older rows so the table never has too many rows. If you think about it, after a few days, you probably do not need to look at this very detailed level of values information within a day. In that case set retention to delete after a few days retainVal=3 retainUnit=day.
- Now move down the screen and click the Save button, and wait for MX to pop up Settings Saved message.
Another table updated at an interval measured in seconds
- 6. Custom upload - seconds interval
- This feature allows you to specify your own SQL for an upload to be repeated every NN seconds. This caters for when you want something like the values in "realtime.txt" but want to specify your own schema (set of column names) or your own interval between updates (independent of what has been selected for real-time interval). Like the other custom options, this might be because you have extra sensors or do not have sensors for all items in standard log file.
- Apart from the Save button below all options, there are 3 items specifically for this option:
- A tick box to enable or disable this upload (so you can leave the SQL recorded in Cumulus.ini for when you want to use it again, but start/stop running it as and when you like).
- The SQL you want to run, it should include INSERT IGNORE (or REPLACE or UPDATE) to insert a row, the name of the table, the columns to be updated and the values you include in your SQL are expressed as web tags. You can have more than one SQL statement in this box (end each with semi-colon) so you might want to add a delete "DELETE FROM YourTableName WHERE LogDateTime < DATE_SUB(NOW(), INTERVAL 7 DAY);" after your update/insert command to replicate the retention option of the previous feature, in this case deleting rows over a week old.
- The number of seconds between runs, the default is 10, but if your weather station updates less frequently, maybe you will choose 40 or 60 as the interval. In theory the number of seconds specified here might represent anything between how frequently your weather station reports readings and several hours.
Alarms
![]() This section was last updated for the MX release in July 2020; that is no longer latest!
This section was last updated for the MX release in July 2020; that is no longer latest!
Appeal to contributors: Please work through all MX release announcements and work out all the many updates needed for this section,
recent releases have totally changed the content of all settings pages in the admin interface,
consequently, the whole page may even need either a replacement set of pages, splitting of this page into multiple pages, or just a redesign of this section, for more recent releases!
This is identical to Cumulus 1 functionality, apart from using a new default location for the files "\CumulusMX\interface\sounds", and the list of alarms available is extended in MX compared to Cumulus 1.
The alarms available are already explained elsewhere in this wiki, so are not repeated here.
Some alarms are shown at the bottom of the Dashboard page of this administrative interface. They also feed a set of Webtags|web tags so you can use them in web pages.
FTP Now
![]() This section was last updated for the MX release in July 2020; that is no longer latest!
This section was last updated for the MX release in July 2020; that is no longer latest!
Appeal to contributors: Please work through all MX release announcements and work out all the many updates needed for this section,
recent releases have totally changed the content of all settings pages in the admin interface,
consequently, the whole page may even need either a replacement set of pages, splitting of this page into multiple pages, or just a redesign of this section, for more recent releases!
This is similar to the option in the file menu of Cumulus 1 to do an update now. Depending on which build of MX you are using, the functionality varies. On latest build it does whatever updates are set up to happen at normal updating interval whether these are by FTP to your web site, or by copying files between local and remote filenames with path (although both could be on same device).
Editing the Admin Interface
The admin interface provided with MX is generated from some application programming interface (api) produced by MX engine, some JSON files specifying options, some JavaScript files populating content, some cascade styling sheet files determining look, and some HTML files specifying structure. Theoretically, all of this could be customised to suit you as the developer's choices might not match your desires.
Caution against editing Admin Interface
The general advice is do not change any files that are part of the MX package, they are a package and therefore there are interdependencies. Also updating to a newer release is more complicated if you have edited any files, because you need to implement any changes in that release and they will overwrite any edits you have made.
The files as provided in the MX package are a compromise, for example they include reporting on solar measurements but not all weather stations include such measurements.
Given that the admin interface is not shared with anyone else, it could be argued its look and content is not that important. In particular this interface is the only way to change settings, so do not change anything that stops those setting screens from working!
Finally, if you don't like the look of the admin interface, then why are you looking at the admin interface? If it to change settings, does it matter how it looks? If you are looking at the admin interface to see your weather readings and derivations, then why not look at your web pages, as you can edit your web pages to show information in whatever way suits you.
Caution when updating if you have edited Admin Interface
Remember, if you decide to download a new release if you overwrite any file(s) that you have edited, your edit will be lost. It is less likely that a new release will change the interface files than other files, but some releases do change these files. Remember, each release zip contains all MX files, even those not changed since previous release. The release notice will usually give some idea of whether interface files have changed, but it may not list which interface files have been added, modified, or removed.
General points for editing
If you do decide to change any file, I suggest you maintain a back-up copy of the original elsewhere (so it can be gone back to) and you save the edited file under a new name (so you can't lose my edited file by installing a new release).
If you are editing files, use Brackets, Notetab lite, notepad++, or on a Mac BB-edit, i.e. use an editor designed for code. Do not use a word processor, a Microsoft or Google editor or Dreamweaver or any other web editor. The encoding that should be used is UTF, if your editor does not mention encoding, it is the wrong sort of editor!
Changing the look
You need some understanding of Cascading Style Sheets (CSS) to do this, but all you need to do is to edit the relevant style sheet either in \CumulusMX\interface\css or in the relevant folder within the lib folder. Beware, making a change to make one web page in the admin interface look right, might ruin web page in the interface, so making changes is not easy!
You can change the look, it is all defined in .css files. However, because MX makes use of standard libraries (bootstrap, datatables, alcapa etc.) there are a multitude of .css files used and it might not be easy to work out which one to edit. Each HTML page has links to a number of css files.
You will probably make use of developer functions in your browser to inspect any element whose look you wish to change to see where its different properties are defined. It is better to make any such edits at a high level, rather than on any CSS just for that particular element. But don't forget to check every web page in the interface still looks okay as if you do make a change to improve one page it may worsen another page.
As always when editing, keep a copy of original so you can go back to it; keep a copy of your edited file, so installing a new release does not lose you edited file.
Removing Solar Figures
If your weather station does not have solar instrumentation you might wish to remove some of the display elements that relate to that. Of course they will come back when the next release overwrites your change!
You need some understanding of Hyper-Text Markup Language to do this correctly, but here are simple examples.
- Navigate to \CumulusMX\interface folder.
- Open the file now.html in an editor designed for code (some examples were listed earlier)
- Near the bottom of the file edit it by inserting HTML comment delimiters (opening after </thead>, closing before </table>) so it looks like this:
<table id="SolarTable" style="width:100%">
      <thead>
          <tr>
               <th> Solar</th>
               <th></th>
               <th></th>
         </tr>
      </thead>
  <!--
         <tr>
               <td>Solar Radiation</td>
               <td><span id="SolarRad">--</span></td>
               <td>W/m<sup>2</sup></td>
         </tr>
         <tr>
               <td>Sunshine Today</td>
               <td><span id="SunshineHours">--</span></td>
               <td>hrs</td>
         </tr>
         <tr>
                <td>UV</td>
                <td><span id="UVindex">--</span></td>
                <td></td>
         </tr>
   -->
</table>
IMPORTANT NOTES:
- The above approach works on "now.html", but it does not work on other pages where table rows are dynamically created by an external script, so the existing rows in the table body are dummies whose content is ignored.
- An alternative technique is to delete the whole table and any "<div> ... </div>" that surrounds only that table, deleting entire code should work on all the HTML pages.
Adding derivatives not shown on the existing admin interface page
An application processing interface (api) is used to obtain the values (or in some cases entire tables) shown on many of the web pages in the admin interface. These api are hard coded within the MX code and so you can not edit them. However, in a few cases, the api being used does provide more values than are coded to be shown on a web page. The standard \CumulusMX\interface\now.html does not include temperature trend for example, but because there is a temptrend: inp.TempTrend.toString() defined, you can easily add it to the "now" page by a simple insert of the middle row shown here in its context:
<tr>
          <td>Outdoor Temperature</td>
          <td><span id="OutdoorTemp">--</span></td>
          <td><span class="TempUnit">--</span></td>
</tr>
<tr>
           <td>Trend</td>
           <td><span id="TempTrend">--</span></td>
           <td><span class="TempUnit">--</span> hour<sup>-1</sup></td>
</tr>
<tr>
           <td>Dew Point</td>
           <td><span id="OutdoorDewpoint">--</span></td>
           <td><span class="TempUnit">--</span></td>
</tr>
You can't add any derivatives into any table unless the value (for the derivative you want to add) is already defined in the related api and JavaScript files.
There is a section of the support forum devoted to Cumulus MX interface customisation, so you can see what other people are doing. There is also another sub-forum for making suggestions on what you would like added to MX.